Get Ready to Fly
If you've made it this far, hopefully you have a better appreciation, and perhaps some excitement, about what luminosity masks can do for your pictures. I encourage you to experiment and play with the techniques discussed here and hopefully find some new ways to develop your images.
Since it takes multiple mouse clicks and keystrokes to actually create luminosity masks, automating the process in Photoshop is the logical next step. Luminosity masks become a natural part of the developing workflow when Photoshop does all the heavy lifting. It's also a lot of fun to see what these masks can do once you have them readily available. To make the process of generating luminosity masks as easy as possible, I've also created a free Photoshop plugin for Photoshop CC and Photoshop CS6. This plugin generates luminosity masks with a single button click. There are also output options programmed into the plugin to make deploying the masks into your workflow a one-click process.
FREE!
Get a Photoshop plugin to make Luminosity Masks
The Plugins & Videos page also has the free TK Lum-Mask plugin plus a couple of other free items. For Photoshop Elements and pre-CS6 versions of Photoshop, there is a set of actions that can be downloaded and installed to make all the masks in this tutorial. If you really want to dive into luminosity masks, a Photoshop plugin is the best option. When you're ready, the Plugins & Videos page also has more comprehensive plugins and videos available to makes sure you can make the most of these exciting techniques.
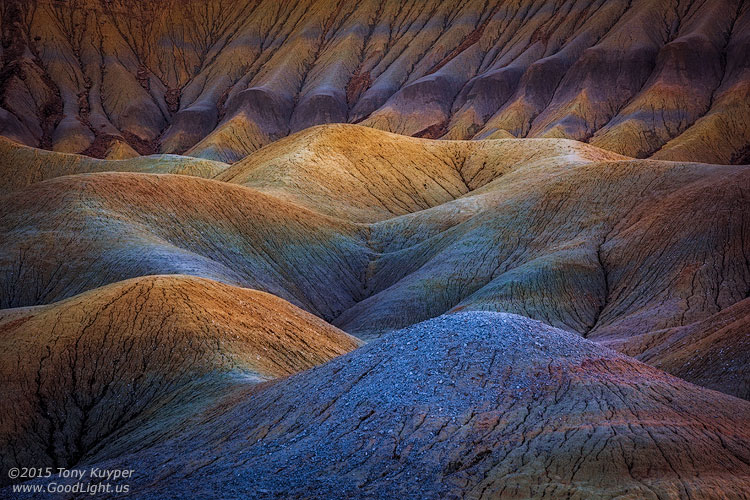
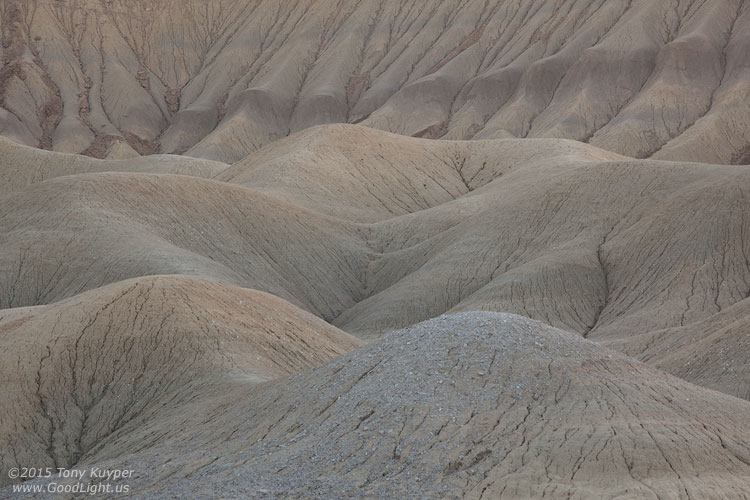
Since writing this tutorial, I've never stopped experimenting with luminosity and other pixel based-masks like saturation, color, and channel masks. These masks have changed the way I approach images both in the field and in Photoshop. The image below is a more recent example that was processed primarily with masks generated from my latest plugin. If you roll the mouse over the image, you can see the unprocessed RAW file. As with luminosity masks, creating images like this takes some practice initially, but once you get a feel for what these masks can do, you'll continually and confidently find new ways to make them part of your creative workflow. These masks will change the way you process images, and in doing so, you will create truly signature pictures that reflect your personal approach to photography.
Below are comments from photography blogs, newsletters, web posts, and personal correspondence from photographers that have reviewed the tutorial and used the actions:
- "Your actions are transforming the world of landscape photography! The saturation and luminosity masks have become critical steps in my processing." —Michael Anderson.
- "Thanks so much! Of your work, I use the Channels Lum Masks almost routinely. They are a tremendous help. I probably use the highlight masks the least and the shadow mask the most. I also want to thank you for the distribution format you have developed. I really like the balance of high-quality information and instruction that is straightforward, of great interest and value to me, is NOT overproduced, and is priced so that the buy decision is easy. I certainly have paid a lot more for software that I have ultimately found of little value to me." —Eric Vogel
- "I just discovered your luminosity mask method via a link mentioned within a post on lighting essentials... I've been playing with it as explained in the tutorial as I waited for the actions and WOW... I'm floored. I am a graphic designer by trade, a serious photo hobbyist and a photography blogger, and consider myself very well versed in Photoshop, Lightroom and photo retouching in general... but this method is a game-changer for me. I've only retouched a couple images so far using it and I'm realizing that it has just completely changed the way I look at retouching. THANK YOU!!!" —Ryan Goodman
- "I absolutely love the Lum Masks. I appreciate the work that went into them and all I can say is I simply won't process an image without them now." —Don Giannatti. Don's online tutorial describes how he uses the Luminosity Masks in his workflow.
- "I think that what was going on for me in the past was that I was spending so much energy just trying to create the masks and not feeling certain that I did 'em right. With your actions, I played them, and then I was able to use them with more confidence and I wasn't confusing the creation of the masks with their use. It was wonderful to see more details in the highlights and shadows after using your masks!" —Tim Mulholland
- "Great information and thanks for sharing. I've been using these manually for a while and decided your actions looked like a great time saver and would be worth a donation. I know you have a lot of time invested in making them." —James Quantz, Jr.
- "BTW, after weeks of having your actions, I think the masks are Brilliant!!!" —Ferrell McCollough
- "Tony, I've been meaning to tell you.....those luminosity masks have become an integral part of my workflow on virtually every image. Well done." —Kirk Gittings
- "Tony Kuyper has created a fantastic tutorial on generating and using luminosity masks in Photoshop. For any of you who ever need to make changes to just a part of an image (and who hasn’t), these masks make it a lot easier and a lot more effective." —Rod Barbee Photography
- "Ever since I read Tony Kuyper's tutorial on luminosity masking, I have a really hard time staying away from them, particularly for landscape shots with a lot of tonal range. Tony offers some actions at the end of his tutorial that makes what sounds complicated very simple. It can become very tempting to constantly want to fiddle when you have this much power so easily over an image." —Graf Nature Photography
- "The tutorial explains the utility and basics of luminosity masking far better than I could in a single post. The uniqueness of this particular tutorial is the included set of downloadable actions with instructions for their use. More importantly, the actions allow one to easily generate not only a standard luminosity mask, but also masks that are ‘ultra-directed’ to the brightest highlights, the darkest shadows and everything in between. This allows one to generate luminosity based selections that are automatically feathered and which allow fine control over the entire tonal range of an image. I plan to use the actions frequently. I think they are a real find." —Howard Grill Blogspot
- "For a thorough discussion of luminosity masking – and to see some beautiful landscape images of the Colorado Plateau area – check out Tony Kuyper’s web site. Tony has a great tutorial and offers a number of masking actions which you can download for a small donation. I highly recommend you visit this site." —John Shaw
- Ron Niebrugge is an excellent and prolific nature photographer. His website is evidence that there are beautiful pictures everywhere. He has written a review of the luminosity masks for his Photo Blog. There is also a second entry in the blog on using the masks to facilitate HDR in Photoshop.
- "While slaving over the computer (it is beginning to feel that way) I came across a few more tools I wanted to pass along for working on your images. The most impressive is the Luminosity Masks by Tony Kuyper." —Jess Lee
Additionally, here are some comments regarding the initial release of this tutorial and the action set in November 2006 on Nature Photographers.net.
- "I've had the pleasure of reading it before and could barely keep the secret for much longer - it's a superb article with the valuable bonus of a very useful set of actions. Thanks Tony!"
- "Tony, thanks for posting this. I've played with several photos using the technique and it's great. Something I will use routinely from here on out."
- "I have admired your wonderful work for some time now. The beautiful glow which your images possess is incredible. Rod has already said that this is one of the best Photoshop related tutorials that he has read anywhere and I wholeheartedly agree! It was beyond gracious to share your secret with us. I tried my first image last night and was able to substantially improve it. I'm sure I've only scratched the surface of its capabilities and look forward to your follow up article. I assume that it will be just as helpful for monochrome as color. I'm sure you must have considered submitting it to a print magazine or having it as a chapter in a future book. Anyway, it's a great technique, clearly explained, and expertly written. Thanks again for sharing your knowledge and techniques!"
- "Thanks very much Tony. Already have improved an image beyond what I could before using these. Am looking forward to using them more and likely reworking some images."
- "I had to read this a few times and work with it, I'm finding the midtone mask a great way to enhance the midtone contrast. This is really good stuff, Tony."
Thank you for taking the time to read and study this tutorial. I hope you will find it useful and that you will be as enthusiastic as the first people who read it. Please feel free to contact me with your comments, suggestions, and questions. I've also added information on some other very useful Photoshop techniques to this website. Please visit the tutorials index for a complete list.