Using the "Lights" Mask
A good way to see how the "Lights" luminosity mask works is with an image called "Zion Narrows" that I posted in an online discussion/critique forum. There were several comments that it looked a little overexposed. This suggested that the light areas of the image might be a little too bright, so using the "Lights" mask was one possible solution. An adjustment through the mask would allow me to correct this perceived brightness by darkening the image's light areas since the mask would be correspondingly light and revealing of the adjustment. It would at the same time protect the shadows from getting too dark since the mask would also be darker and therefore concealing of the adjustment in these areas. In other words, the mask allows the adjustment to affect predominantly the light areas of the image while at the same time sparing the dark areas. The process for using the "Lights" mask is relatively straightforward and goes like this:
First create the "Lights" mask as previously described in the The Basic Mask—"Lights" section.
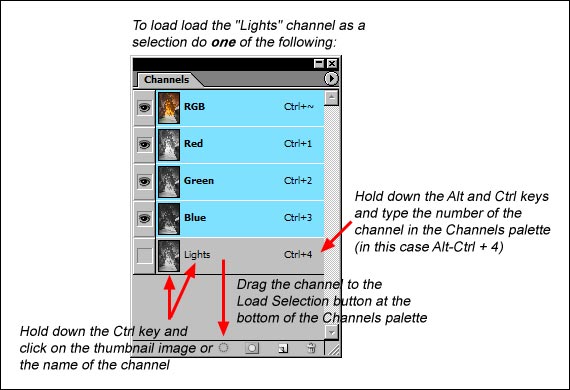
Then, and this is very important, make sure the mask is loaded as a selection. If you're using my actions (available at the end of this tutorial) to create a luminosity mask, the mask is created, placed on the Channels palette, and given the proper name. However, it is not an active selection; there are no marching ants. In order to actually use the luminosity mask with an adjustment layer, it is necessary to properly load it to make the mask an active selection. This is done using any one of the following methods (Figure 7):
- Type Alt-Ctrl+number. Hold down the Alt and Ctrl keys and type the number of the mask's corresponding channel in the Channels palette (Alt-Ctrl+4 in this case).
- Drag the channel to the Load Selection button at the bottom of the Channels palette.
- Ctrl+click the thumbnail image or the channel name. (NOTE: Do not Ctrl+click on the eyeball square to the left of the thumbnail image as this does not load the channel as a selection.)
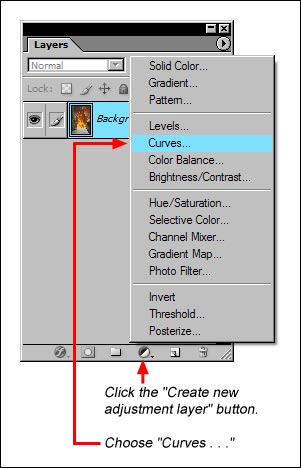
Once the ants of the selection are marching again, move to the Layers palette. At the bottom of the layers palette is a half white/half black circle which is the "Create new adjustment layer" button. Click it and choose "Curves..." from the pop-up menu that appears (Figure 8).
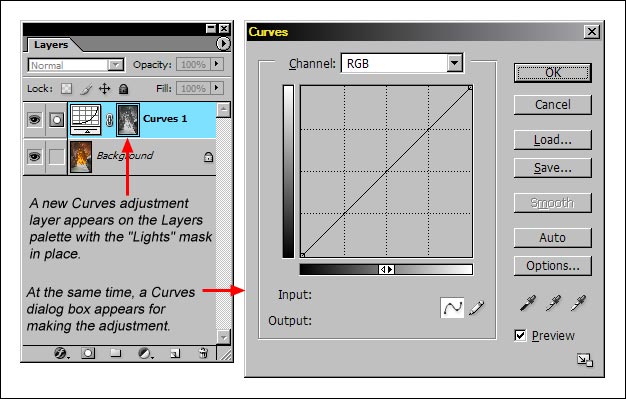
A new layer immediately appears on the Layers palette with a mask in place that matches the "Lights" mask, which was the active selection. Simultaneously a Curves dialog box appears (Figure 9).
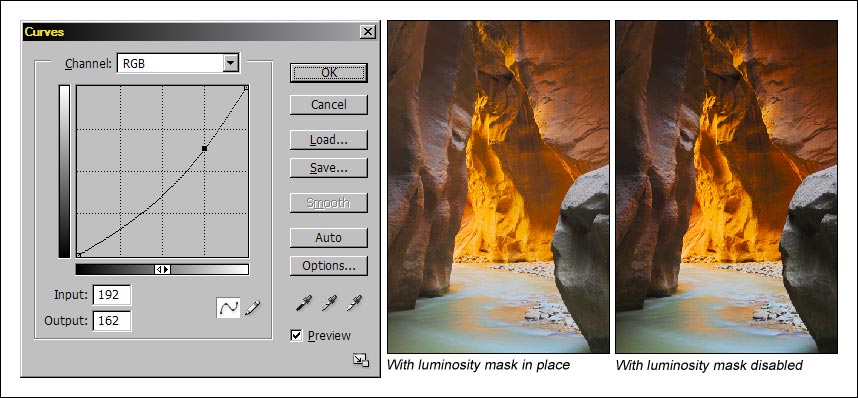
Make the adjustment in the Curves dialog box to darken the highlights and click "OK". Figure 10 shows the curve I chose and the results with the mask in place. The "white reveals" rule for masks insures that the adjustment occurs mainly in the light areas of the image. For comparison, I've also shown the results with the mask disabled. Although it might be difficult to see on a monitor, if you look closely you should be able to make out that without the "black conceals" moderating effect of the mask, the dark areas in the image get significantly darker as a result of the adjustment.
Don't forget that when creating adjustment layers using luminosity masks, there must be an active selection at the time that the adjustment layer is created. If using my actions, be sure to load the luminosity mask as a selection (Figure 7) before clicking the "Create new adjustment layer" button. Usually there will be marching ants to indicate that there is an active selection, but sometimes there won't be, and I'll describe this situation later. If there is no active selection, a pure white square will appear on the adjustment layer where the mask should be. The white square will allow the adjustment to affect all pixels in the image equally, and not just those intended by the luminosity mask.