Luminosity Mask Triple Play and Advanced Masking
The Luminosity Mask Triple Play and Advanced Masking tutorial once again focuses on luminosity masks and demonstrates a creative and somewhat unusual way to use these tools to develop images in Photoshop. The "triple play" refers to the ability to use one process to control three important qualities in the image:
- Brightness--making the image lighter or darker
- Contrast-–the degree of tonal separation between light and dark tones
- Detail definition--the local contrast that makes image elements look sharper and more detailed
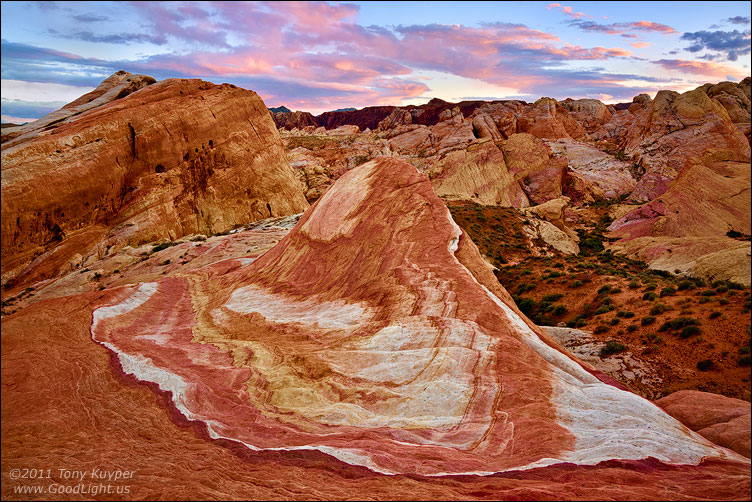
Figure 1 shows the results of applying the triple play procedure to an image. The mouse rollover of the image shows what it looked like without the triple play. There are several things that should be apparent, even in the jpg.
- The triple play darkened the highlights.
- Highlight contrast has also increased.
- The brightness of the shadows didn't change much, but the contrast in the shadows was again slightly increased.
- There is better detail definition in almost all parts of the image.
The best places to see what the triple play is doing is in the clouds and sky, the large rock face on the left side of the image, the whites in the main foreground rock, and the plant-covered sandy area to the right of this rock. In all these areas, which encompass much of the image, brightness, contrast, and detail have been altered to improve appearance and provide personal expression. The triple play accomplishes this by using luminosity masks in new and somewhat surprising ways such that all three variables can be addressed at one time.
Figure 1--This is the final image. Mouse rollover is the image without the triple play procedures.
|
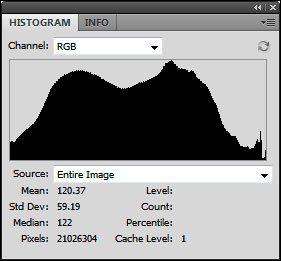
It's worth noting that the improvements in brightness, contrast, and detail for this image did not come at the expense of overall dynamic range. Figure 2 shows the image's histogram after the triple play was completed and rollover shows it before. There is very little additional clipping at either end of the histogram after the triple play, which means that all the improvements took place within the bounds of the image's dynamic range. This is important. It means that no pixels have to be sacrificed to being either pure black or pure white in order to achieve the improvements possible with the triple play.
Figure 2--This is the histogram of the image after the triple play was applied. The rollover image shows the image histogram without the triple play.
|
One of the hallmarks of the triple play is its ability to improve detail definition in almost any image, especially in the dark shadows of images with left-shifted histograms and in highlight areas that are looking thin. However, this detail enhancement should not be confused with image sharpness. While it might appear that the sharpness of the image improves after the triple play, this is actually the result of improving local contrast in areas of the image where local contrast is usually hard to control. "Sharpness" refers to the contrast at the "edge pixels" where tones change, and by increasing contrast along these tonal edges, sharpness is increased. The triple play affects all the pixels included in the tones selected by the luminosity mask, not just those at the edges. Local contrast is improved with the triple play in all selected pixels (or partially selected pixels, as the case may be with luminosity masks), not just in those along the edges.
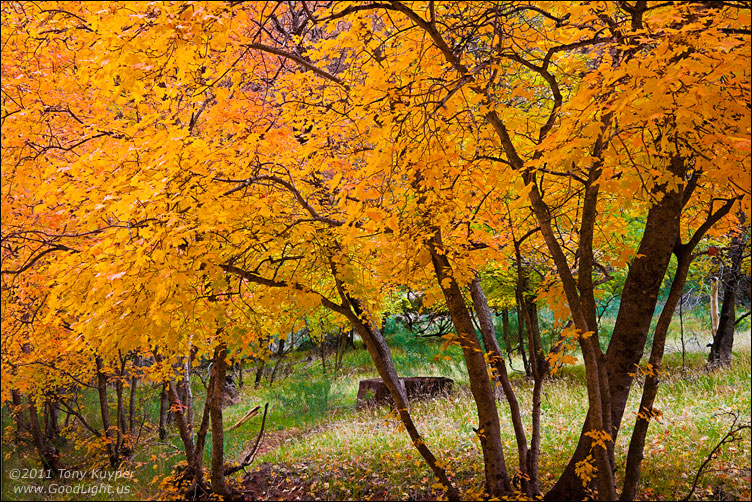
Of course, no amount of Photoshopping can add detail to an image where none existed to begin with, but the triple play works with Photoshop to take what detail was captured and make it appear more significant. Leaves and grass are a good photographic example where detail sometimes gets lost in the wash of similar colors and tones. Figure 3 shows an image that was considered "finished" until it was decided to see what the triple play might do for it. The no-rollover image is what the image looked like after the triple play and the rollover is before. Both images were identically resized and sharpened for the web. While the triple play was used to add a little brightness to the shadows, it's the change in detail in the leaves and grass that's most apparent between the image and the rollover. Figure 3 demonstrates how, even on images that are considered finished, the triple play still makes a noticeable improvement. As shown above, the histogram needn't change much with the triple play. This is all happening within the image's dynamic range, so even on "finished" images with a wide dynamic range, there is still room for the triple play to work. While the jpeg can show the detail change possible with the triple play, it's the full-size print where the this technique is most appreciated. Prints actually invite close inspection to see the new level of detail revealed in the image.
Figure 3--This image demonstrates the detail enhancement that is possible with the triple play. The image (no mouse rollover) shows the detail that resulted from the triple play. The mouse rollover shows the image with the triple play layers turned off. The pre-triple play image (rollover state) has significantly less detail definition than the post-triple play image (no rollover). The image and the rollover had identical web-sharpening procedures applied to them.
|
The triple play is a somewhat advanced technique requiring several different steps done in the right order in Photoshop. The tutorial reviews the process in considerable detail to insure that the reader knows what's happening and can make choices and alterations based on their particular image. However, the layers and the masks and steps to create them are repeated each time the triple play is run, so a Photoshop action can be recorded that sets everything up. With a Photoshop action, the triple play effect—and its many variations—can all be completed in a few mouse clicks. The Photoshop actions to do this are included with the tutorial, along with a detailed description of how the actions work. The actions actually simplify the triple play to the point where it becomes one of the easiest ways to adjust an image using luminosity masks and to experiment with different alternatives.
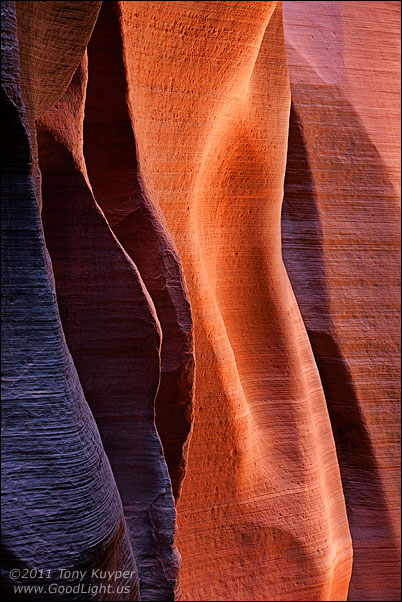
Figure 4 shows an image where the triple play actions were employed early in the Photoshop development process to quickly improve, and, to a large degree, finish the major adjustments needed for the image. Once the actions finished running, it was possible to make triple play choices that would open the dark tones slightly, making them a little lighter with enhanced detail, and darken the light tones significantly, again with enhanced detail definition. The rollover state of Figure 4 is the converted RAW file with only minor adjustments, but no triple play. Almost all the major improvements to the image were the result of the triple play that were facilitated by and quickly accomplished with the actions. So while finished pictures can benefit from the triple play, the technique can also be used early on to speed image development. The actions make performing the triple play very easy and allow users to experiment with many different variations to see what works best for each image. The tutorial describes these variations and how to choose among the different options.
Figure 4--This is an image where a significant amount of development occurred using the triple play actions. The rollover shows how the converted RAW file looked without the triple play.
|
In addition to explaining the triple play procedure and the Photoshop actions to produce it, the Luminosity Mask Triple Play and Advanced Masking tutorial has one more component, and that is the "advanced masking" part. Luminosity masks are remarkably useful and flexible when it comes to image processing, but once they are created, the pixels they select are fixed by the tones in the mask. However, these tones are themselves subject to adjustment, and the tutorial reviews techniques for fine-tuning these tones to construct luminosity masks that are even more specific for the layers they mask. These techniques can be applied when using luminosity mask outside the context of the triple play, and users are encouraged to experiment with these techniques on their own images and in different situations.
The Luminosity Mask Triple Play and Advanced Masking tutorial and the Photoshop actions to run the triple play are included in the "Complete Luminosity Masks" and "Complete Catalog" sections on the Special Offers page.