Introduction
Color saturation, often simply called "saturation," is commonly defined as the purity of color. A pure color is one that is made up relatively few wave lengths of light. There is an obvious intensity to saturated colors because they aren't muted or washed out by the presence of other colors.
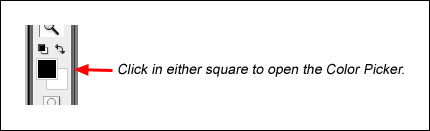
A good way to see saturation is with Photoshop's color picker. To get to it, single-click either square of the Set Foreground Color/Set Background Color boxes on Photoshop's tool bar (Figure 1).
Figure 1
|
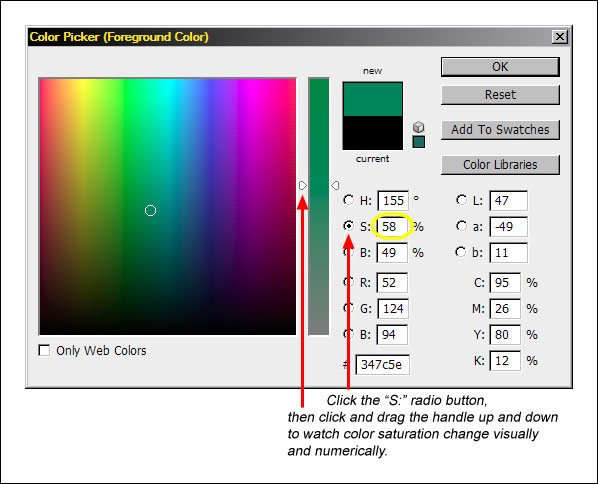
Once it's open, click the radio button beside the "S:" which stands for saturation. Now drag the handle on the vertical color bar to the right of the big square up and down. When the handle is at the top, color saturation is 100%; at the bottom 0%. As you drag the handle, it's easy to see color saturation change visually inside the large square and numerically in the box beside the "S:" (Figure 2).
Figure 2
|
The Color Picker shows that Photoshop already knows the degree of saturation for every color it can produce. This is an important point. By coaxing the program to share this information graphically, a mask becomes available that allows new opportunities to control the way saturation affects our pictures.
Saturation makes a big difference in how an image is perceived. In general, we are drawn to more saturated colors. They are strong and bold and make an image feel more intense. If we want to convey a sense of beauty, like in nature photographs, increasing color saturation is often helpful in eliciting this emotional response.
Despite its ability to convey emotion and strengthen an image, saturation is often overlooked in the workflow to get an image to its final form. This is not surprising. Photoshop's main tool for affecting color saturation, the Hue/Saturation adjustment, is a relatively blunt instrument. It affects the saturation of all colors in the image or a specific color range, but doesn't adequately take into account how saturated or unsaturated a color is before the adjustment is applied. Small changes in the saturation using the Hue/Saturation adjustment can have a significant impact on the colors of the image. In addition, some colors in an image that need to have their saturation adjusted are an amalgam of so many different colors that it's nearly impossible to target the right color without ruining the saturation in other parts of the image. So it's not surprising that a saturation adjustment is frequently tentative, less than satisfying, or not attempted at all. It is often a last resort when other adjustments have messed up the saturation and there is a need to torque it back to normal. Rarely do we use saturation creatively to actually make our images better. Photoshop's standard tools are just too crude.
The saturation mask is the way to change that. It's a layer mask, actually two layer masks, that allow the user to focus saturation adjustments exactly where they are needed. This tutorial explains how to create and use these saturation masks to overcome the problems inherent with Hue/Saturation adjustments. And because the masks allow considerably more control, they permit much bolder use of saturation to creatively enhance an image. The steps are a little involved, but they can easily be saved as an action that can be run from Photoshop's Actions palette. Like the luminosity masks in the first tutorial, I use the saturation masks in every image I make. By the end of this tutorial, I hope you too will see the potential for saturation masks in your own work and how they will allow you to personalize your images like never before.
As with the Luminosity Masks tutorial previously published on this website, I will mention that I work on a Windows-based computer running Windows-XP. I've now upgraded to Photoshop CS3, so the screen shots will look a little different than in the previous tutorial. I will try to explain things as fully and clearly as possible, but some beginners may need to reference a User's Guide or Photoshop's embedded help menu if there are unfamiliar terms. There will be a few steps that are best accomplished with shortcut keys. These are a combination of the Shift, Ctrl, and/or Alt keys being held down at the same time and, while continuing to hold them down, hitting a letter, number, or symbol on the key board. The ones I list will be the defaults that come programmed into Photoshop for Windows operation. Mac users, smart crowd that they are, will undoubtedly know the corresponding key combinations for their computers. There are usually drop-down menu commands that correspond to the shortcut keys, but these often become more complex than the shortcut keys, so I generally don't use them. I also like the classic Windows look to my programs with neutral gray colors, so the screen captures will reflect my predilection for this traditional look.
Lastly, since it was covered in some detail in the Luminosity Masks tutorial, I won't spend as much time explaining how masks work in this tutorial. You can refer to that tutorial if you need this information.